Kubernetes Services for Absolute Beginners — NodePort
Kubernetes services:
- Enable communication between various components within and outside of the application.
- It helps us connect applications together with other applications or users.
- It is an object, Just like Pods, Deployment, or Replicaset.
For example, our application has a group of pods running various sections such as a group for serving front-end load to users and another group for running back-end processes and a third group connecting to an external data source.
Here the service comes into play, it is the service that enables the connectivity between these groups of pods. Services enable the front-end application to be made available to end-users, it helps communication between back end and front end pods and establishes connectivity to an external data source.
There is three types of Kubernetes services:
- NodePort: The service makes an internal pod accessible on a Port on the node
- ClusterIP: It create a Virtual IP, inside the cluster to enable communication between different services such as a set of front-end servers (i.e. web-server) to a set of back-end servers (i.e. db-servers).
- LoadBalancer: it provisions a load balancer for our application in the supported cloud provider.
Let’s take a look of one use case of NodePort services:
One of its use cases is to listen to a Port on the Node and forward requests on that Port to a Port on the Pod running the web application.
Let’s say we deployed a pod having a web application running on it, how do we or someone else as external user access the web page?
- Our Kubernetes node has an IP address and that is “192.168.2.12”.
- Our laptop is on the same network as well having IP “192.168.2.11”.
- The internal Pod network is in the range of 10.200.0.0.
- And the pod has an IP 10.200.0.4.
As per the above scenario, we cannot ping or access the webpage running in the pod from the laptop as it’s in a separate network.
To access the webpage, We need to SSH to one of our Kubernetes node and from that node we will be able to access the Pod webpage by doing a curl
# curl http://10.200.0.4
But this is from inside the Kubernetes node, and that’s not what we really want, we should be able to access the web page from our laptop without having SSH into the node and simply by accessing the IP address of the Kubernetes node.
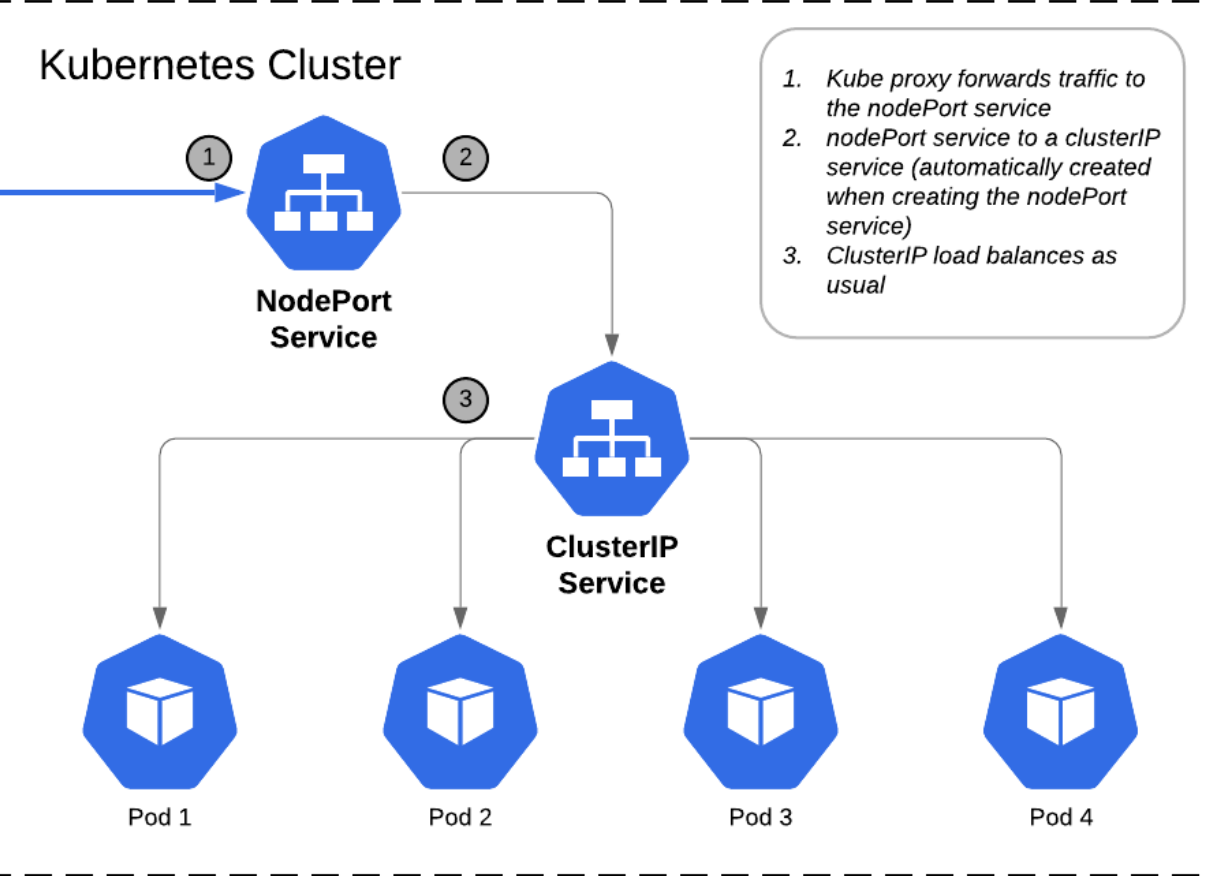
And here we need something in the middle to help us map requests to the node from our laptop through the node to the pod running the web container, and here the NodePort service helps as a mediator.
“The service is like a Virtual Server inside the node. Inside the cluster it has its own IP address and that IP address is called the Cluster IP of the service”
In NodePort Service, there are 3 Ports involved:
- The port on the pod, where the webserver is running is 80, referred to as “target Port”, because that is where the service forwards the requests to.
- The second port is the port on the service itself, referred to as a “Port”
- And last we have a port on the node which we use to access the webserver externally and that is known as the “nodePort”. Nodeport can only be in a valid range which by default is in the range from “30000 to 32767”
- service-defination.yaml
apiVersion: v1
kind: service
metedata:
    name: web-service
spec:
   type: NodePort
   ports:
   - targetPort: 80
     port: 80
     nodePort: 32000
   selector:
     app: my-webapp
     type: webserver
here under the spec section, under ports the only required field is port. If we don’t provide a target port, it is assumed to be the same as a port and if we don’t provide a nodePort a free port from a valid range between “30000 to 32767” is automatically allocated. We can have multiple such port mappings within a single service.
In a Kubernetes cluster, there could be n number of web-service pods running on Port 80, and in order for our service to connect with correct Pods, we always need to use the pod’s labels in the service definition file under selectors property, just like we are using in Deployment or in Replica-set definition file.
To create the service run the below command:
kubectl create -f service-definition.yaml To see the created service, run:
kubectl get servicesTill now we understand how to access the web-server through the service mapped to a single pod, but in a production environment, we could have multiple pods for the same web-server, scheduled on the same or different nodes for high availability and load balancing.
Let’s say we have 3 or multiple pods running similar application with the same labels and the same labels is used as a selector during the creation of the service. So when the service is created it looks for a matching pod with the labels and finds 3 of them.
The service then automatically selects all 3 pods as endpoints to forward the external requests coming for the user, doesn’t matter if the pods are scheduled on a single worker node or on multiple worker nodes across the K8s cluster.
The service is using a random algorithm does the service acts as a built-in load balancer to distribute the load across the 3 different pods when pods are removed or added the service is automatically updated, making it’s highly flexible and adaptive.
Once created you won’t typically need to make any additional configuration changes.
That’s it for Service NodePort, we will discuss for other 2 services in next blog.
Thanks for reading :)
Refer following articles for more insights on Kubernetes:-
How kubectl apply command works?
Kubernetes Services for Absolute Beginners — NodePort
Kubernetes Services for Absolute Beginners — ClusterIP
Kubernetes Services for Absolute Beginners — LoadBalancer
